What’s The Difference Between a 4-in-1 Microinverter and a 1-in-1 Microinverter?
Does 4-in-1 microinverter only mean connecting to four panels?
When you’re first getting to grips with microinverters, you’ll start to hear people talking about ‘4-in-1’, ‘2-in-1’, and ‘1-in-1’ models. If you’re not familiar with the technology it’s easy to assume that microinverters are a bit like software updates: the higher the number, the more advanced the technology. You might think that a 4-in-1 is supposed to be more powerful than a 2-in-1, which is in turn better than a 1-in-1.
But this isn’t actually the case. 4-in-1 microinverters are certainly a very powerful technology, but they’re not necessarily meant to replace other types of microinverters.
Instead, 4-in-1 microinverters are specially designed to solve some specific problems that have plagued installers for years – like how to set up a large number of solar panels without drastically driving up the money and time needed to install lots of microinverters.
Installers should therefore think of 4-in-1s as a new tool at their disposal. They can be used alone, or alongside other types of microinverters; it’s all about assessing the situation and finding the microinverter that’s right for you.
Let’s take a closer look at the difference between 4-in-1 and 1-in-1 microinverters and when you should consider using a 4-in-1 microinverter.
WHAT IS THE DIFFERENCE BETWEEN A 4-IN-1 AND 1-IN-1 MICROINVERTER?
In practice, it’s fairly simple: A 1-in-1 microinverter only connects to (and converts energy from) one solar panel, while a 4-in-1 microinverter connects to four solar panels.
4-in-1 microinverters are still distinct from string inverters, which convert energy from multiple solar panels but only take in power via a single connection; this means that, if one solar panel connected to a string inverter goes down, the entire system can fail. 4-in-1 microinverters, on the other hand, have four independent connections; the output of each panel is tracked and converted individually, so if one panel stops working the microinverter can still continue to convert energy from the other three.
Do 4-in-1 microinverters need more DC extension cables?
Some installers worry that installing 4-in-1 microinverters can create unexpected costs by increasing the number of DC extension cables needed.
But 4-in-1 microinverters are generally set up differently to 1-in-1 microinverters. A 1-in-1 microinverter usually sits to the side of the solar panel to which it’s connected, but 4-in-1 microinverters can be installed in a variety of different ways, depending on the arrangement of your panels.
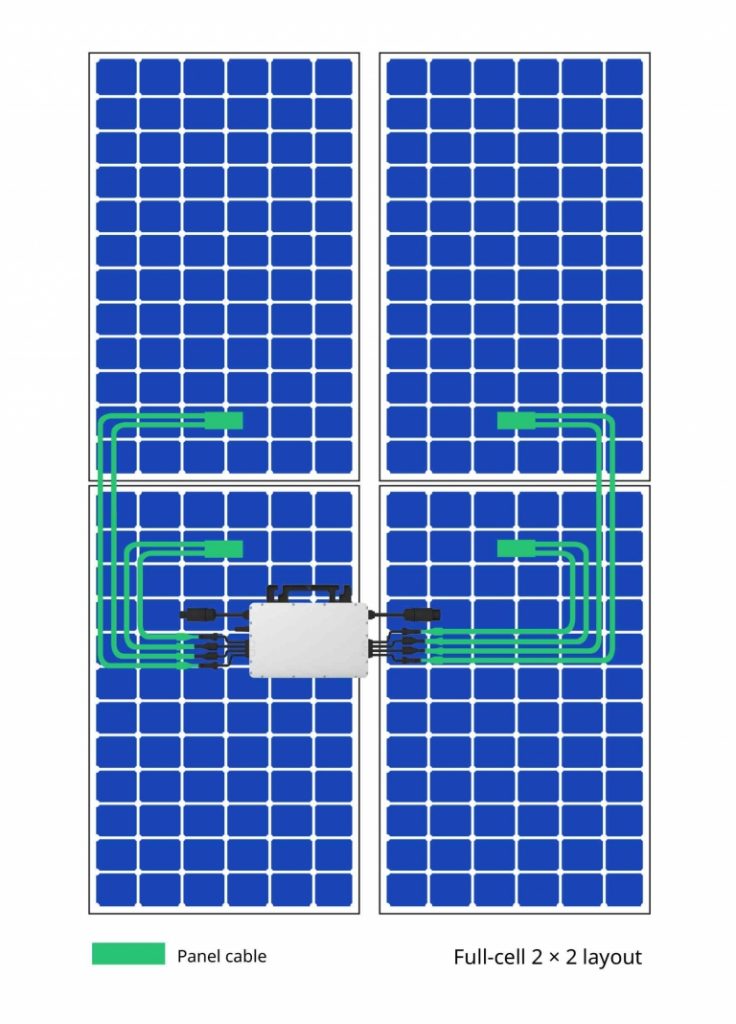
When your panels are installed in a 2 × 2 layout (shown below), the microinverter is usually installed in the center of the four panels. This means that you won’t need any DC extension cables if:
- Your solar panels are full-cell modules
- Your solar panels are half-cell modules with a long DC output cable

Half- and full-cell solar panel modules in a 2 × 2 layout, with the microinverter at the center
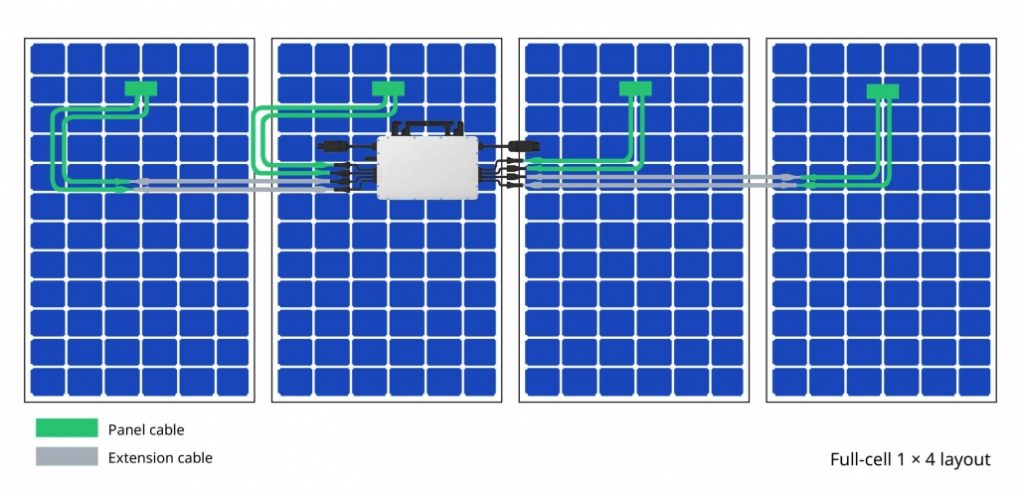
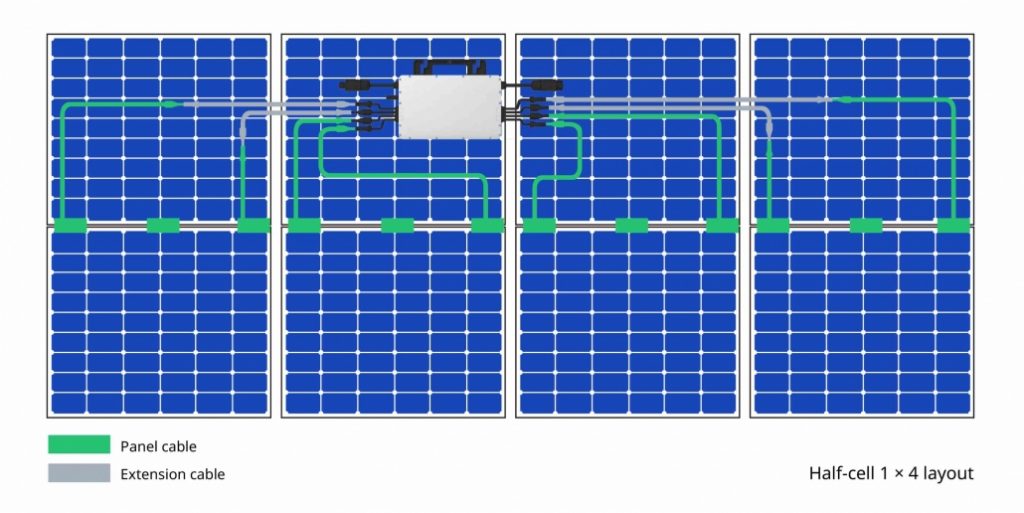
If your solar panels are placed in a row of four (as shown below), the microinverter will be installed between the second and third solar panels. You may need:
- Two pairs of DC extension cables if you’re using full-cell modules
- Two pairs of DC extension cables if you’re using half-cell modules with a long DC output cable
- Four pairs of DC extension cables if you’re using half-cell modules with a short DC output cable


Half- and full-cell solar panels and a 4-in-1 microinverter in a 1 x 4 layout
Even if you have a 1 × 4 layout and need a few extra extension cables, this placement of the microinverter stops the set-up from becoming too messy or drastically increasing the number of extension leads needed.
Do 4-in-1 microinverters get hotter than 1-in-1 microinverters?
4-in-1 microinverters create more heat than 1-in-1 microinverters, simply because they produce more power relative to their size.
In the past, some installers have worried that this might reduce the lifetime of their microinverters, but when the microinverters are well constructed this is rarely the case.
A microinverter’s lifetime is usually closely linked with the lifetime of its electrolytic capacitor – the part of the microinverter that stores electric energy. Hoymiles 4-in-1 microinverters, for example, are carefully designed to protect the electrolytic capacitor by placing it in the coolest area of the microinverter. Thanks to this small change, there’s no reason to think that the microinverter will have a shorter-than-average lifetime.
WHEN SHOULD YOU USE A 4-IN-1 MICROINVERTER?
If you’re choosing between a 4-in-1 and 1-in-1 microinverter, you might want to consider the following questions:
Are you short on time?
A 4-in-1 microinverter can take slightly longer to install than a 1-in-1, as the wiring on each unit is a little more complicated. But installing one 4-in-1 microinverter still usually takes less time than installing four 1-in-1s.
Are you looking for a lower-cost option?
Again, this one’s pretty straightforward: buying one 4-in-1 microinverter is almost always cheaper than paying for four 1-in-1 microinverters. Installers are sometimes concerned that, because 4-in-1s may need more extension cables to connect to all of the surrounding solar panels, this can drive up costs.
As we’ve shown above, you sometimes won’t need any extra extension cables for your 4-in-1 microinverter installation. Even when you do need them, they’re usually inexpensive enough that installing a 4-in-1 microinverter works out cheaper overall.
When is a 1-in-1 microinverter more suitable?
There are some situations where 4-in-1 microinverters just aren’t the right choice.
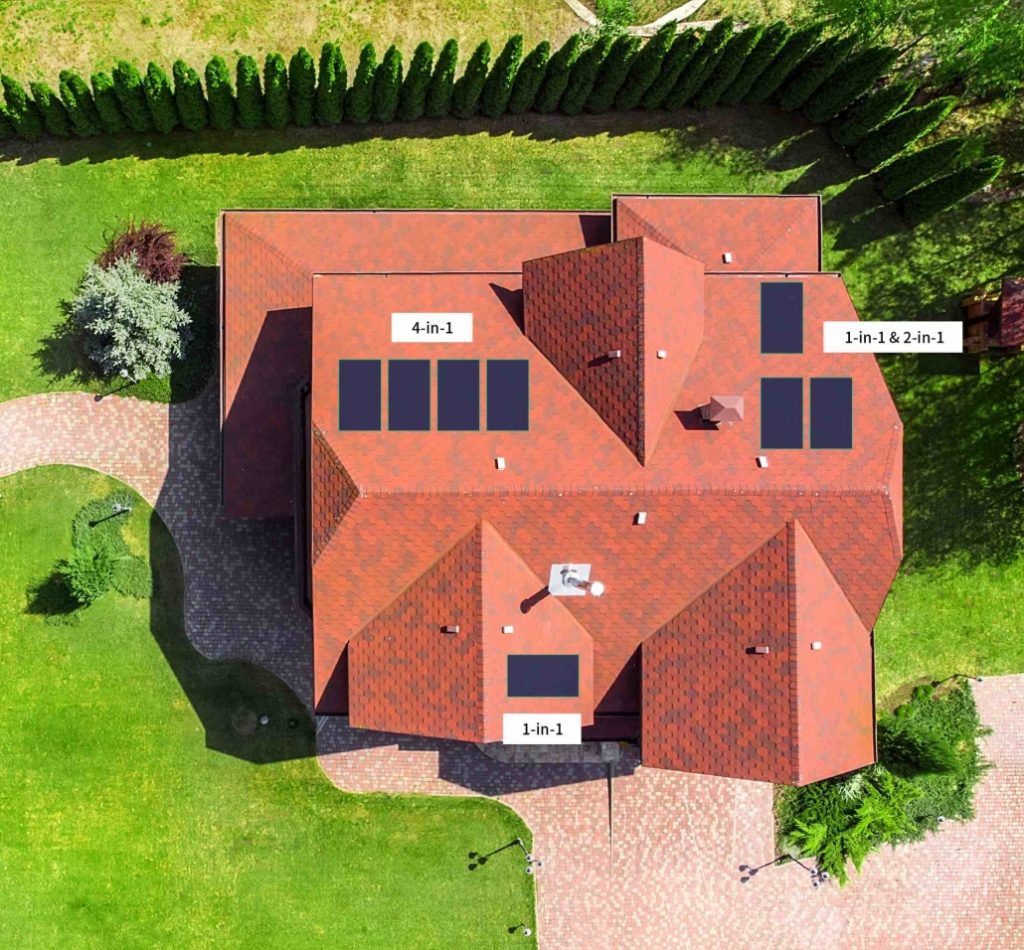
For example, if your roof doesn’t have the space to support more than two or three solar panels, then a 4-in-1 panel is unnecessary; you’d be better off investing in a mix of 1-in-1 or 2-in-1 microinverters.
For example, 4-in-1s need to be within a shorter distance of the solar panels to which they’re connected. Most of the time this doesn’t cause problems, but if your roof structure is very complicated – an irregular shape, say, or with lots of protruding vents and chimneys – then this might not be possible. In this situation, it might be better to invest in a 1-in-1 or 2-in-1 microinverter.

THINGS TO CONSIDER WHEN CHOOSING A 4-IN-1 MICROINVERTER
Now that you know the situations in which using a 4-in-1 microinverter is the best option, there are a few things to consider when you’re choosing between vendors:
● How advanced is the microinverter tracking?
Look for a microinverter that can provide detailed, easy-to-understand insights into the performance of your solar panels – and, most importantly, provide insights in real time so you can quickly spot any dips in performance.
● How long is the warranty and what does it cover?
While a good-quality microinverter shouldn’t fail too often, it’s a good idea to ensure your microinverter is under warranty for at least eight years. The Hoymiles microinverter has a standard warranty of 12 years, and can be extended to 25 years (there are many brands that only have 10 years of standard warranty for microinverter). Our gateway (DTU, a tracking device that basically collects the system data) is under warranty for 3 years, and we are planning to extend it to 5 years from 2022 for the Australia market.
● Can you find 4-in-1 and 1-in-1 units from the same vendor?
As we outlined above, 4-in-1 units aren’t intended to replace 1-in-1s. In some cases, you might want to use a variety of different microinverter types in one installation. When this happens, being able to purchase all of your microinverters from the same provider makes installation, monitoring, and maintenance significantly easier.
● Does your microinverter supplier provide a wide range of power options?
Make sure your supplier can provide a wide range of power options to suit your needs. Hoymiles 4-in-1 microinverters, for example, offer a power range from 1200W to 2000W, so it’s easy to find the right microinverter for you.
COMPARING 4-IN-1 AND 1-IN-1 MICROINVERTERS
So, once you dig into the facts about 4-in-1 and 1-in-1 microinverters, it’s clear that one can’t be ranked above the other. Instead, get to grips with the capabilities and limitations of each model. That way, you can find the model – and build the installation – that’s going to give you and your customers the best performance for the best price.
